Making A Hex Game

With A White-Erase Board and Magnets

The Game of Hex

I was reading about the board games Shogi and Go when I saw the link for Hex. Hex is the game invented independently by Piet Hein (as "Polygon") and by John Nash in the 1940s. (The Hollywood movie A Beautiful Mind and PBS's A Brilliant Madness tell the story of John Nash.) Anyway, I remember having been intrigued, so I decided to find and purchase a game. No Luck. Parker Brothers made a version of the game in the 1950's, but those are out-of-production and quite rare now. There is also a Lord of The Rings version, but it is a very expensive-looking figurine collectors edition. So, I decided to make my own.

I searched the net for instructions, but, surprise, I couldn't find any. It seems that Hex aficionados were all either playing online or were using the bathroom floor as a game board. Still, I wanted to try this game. So, I thought about making one using floor tiling, then wood pieces, then a piece of wood with holes drilled in a hexagonal layout. All of these would have been laborious and required the use of a tool shop -- and still I didn't know what I could use as games pieces. I went to sleep hoping to come up with another idea in my dreams.

The next morning, when I awoke, I began to think about it again, and immediately I had the image of holding a Go stone in my fingers (in my mind). Go stones are either black or white and roughly shaped like a think-in-the-middle pancake -- a little bigger than your thumbnail. However, the image I had in my mind, though it felt like a Go stone, was not. It was . . . it was blue! I had seen this before . . . where . . . where . . . one side was convex; it was lighter than a Go stone; it was plastic; it was . . . it was . . . a white-board magnet! They are common in Japan and come in a variety of colors and sizes. Yahoo! Not only had I come up with a good idea for Hex game pieces, but the various sizes of white-boards themselves seemed ideal for making a Hex board -- and for much less money than I had been imagining 8-)


Setting Out the Board
Setting Up Board
click here or on above photo for bigger image

I bought a metallic 30x40cm dry-erase board (also called "white-board") and packets of white-board magnets (15mm diameter). I bought these at a 100 Yen shop here in Japan. The magnets were ¥100 for packets of ten or fifteen, though I am still looking for better magnets. The board itself was, believe it or not, also ¥100.

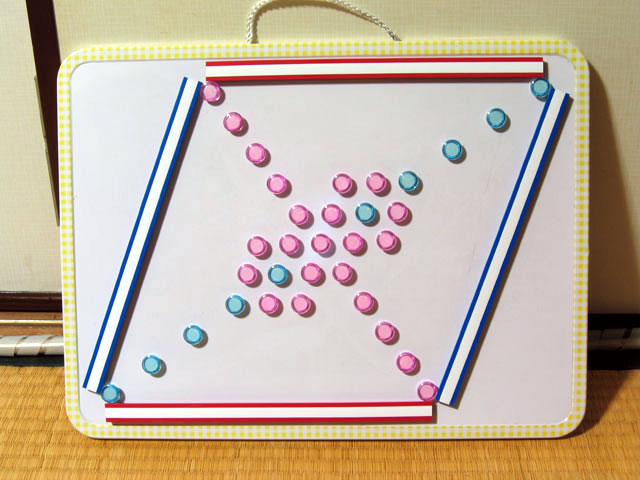
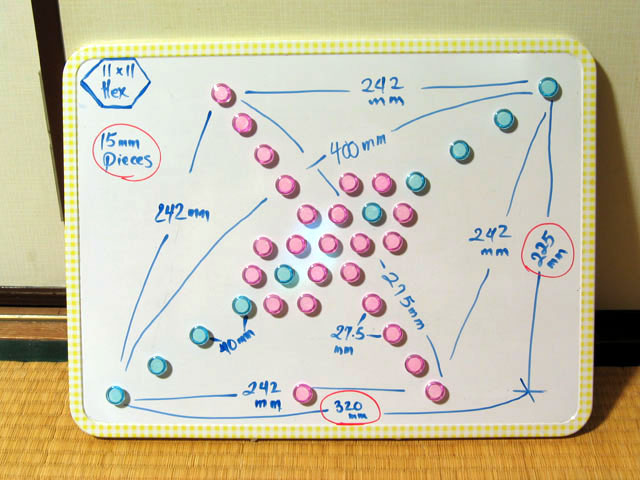
I arranged the pieces in a hexagonal pattern in the center of the board, keeping the magnets spaced far enough apart to allow my fingers to easily place and remove them. I nearly filled the board and then found my diagonals and rhombus shape and cleared off the extra pieces. I determined that an 11x11 configuration was ideal for this board size and game piece size. I opened up the sizing a little, stretching the pieces to go from corner to corner. I also had to rotate the corners a little. The rhombus shape the results from the internal hexagonal pattern is not apparent, at first. Though, if you can get the two edges that "overlap" to run parallel to the long edges of your board, then you'll be OK -- at least for orientation. Sizing will be a different matter.

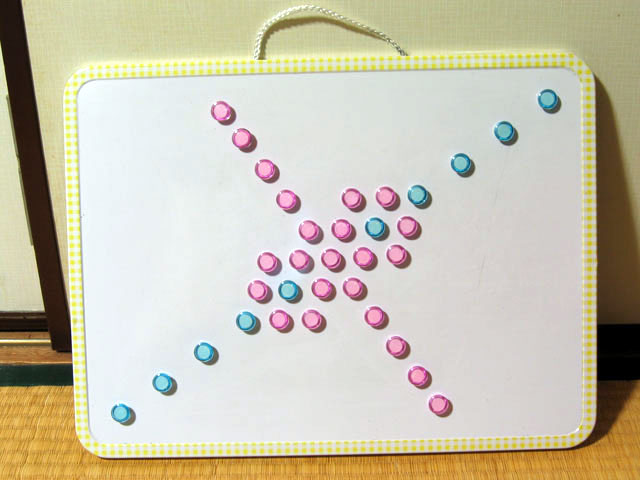
After getting the sizing and orientation determined from the first layout, I made the above "quasar" shape. It is contained within the overall hexagonal layout, but here just the corners and axes are needed. The blue line, 11 pieces, from corner to corner was first. Then I formed the three red, uh, pink, hexagons around the center pieces of the blue diagonal. I could then use that spacing to extend the second axis, the pink one from northwest to southeast. I then measured the distance from the ends of the four axes. In my case, the distances were 240 mm for two, and 245 for the other two. I was proud of myself for getting this close only from "eyeballing" the whole lineup of the guiding hexagons. I used a straight-edge to tap the axes -- sliding them into their final positions -- about 242 mm between each node.

The measurements for my layout are all above. The final shape, minus the labels, is below.

Basic "Quasar"

Basic Quasar

The two axes here can be measured and have each of the pieces placed at the precise final locations. The other pieces will be filled in around these, so using one color for these "unmovable axes" would be wise, not the pink AND blue that I have here. Use the other color for all the other hexagons. You will need to nudge the non-axis pieces into alignment later. Keeping the colors separate will enable you to easily see which pieces to move, and which pieces to use as reference points.


¥400 More for Edge-Alignment

Quasar Boxed

The Pieces All Set Out

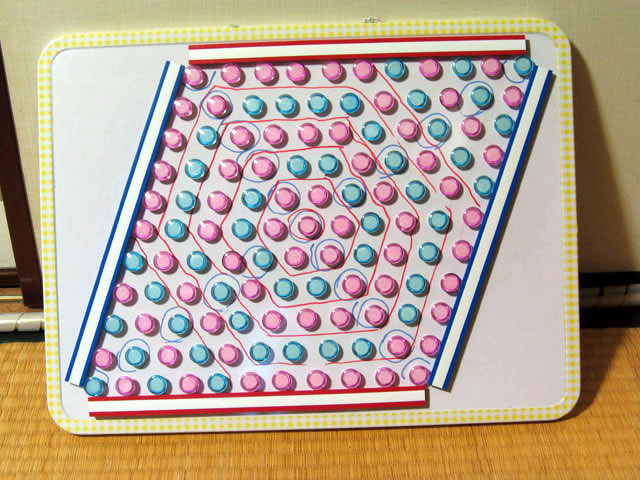
Filled with Pieces

The circled pieces are reference points -- not to be nudged. Again, it would have been better if I had used a single color for these circled pieces.

After the pieces are laid out like this, I then held the board up and looked from the edge. I could see the lines, in six directions, weaving down the board. I nudged here are there -- twisted the board 60° -- straightened the lines here -- spun the board another 60° and straightened those lines too. I did this through several rotations. The final results: the lines were fairly straight from all perspectives!


Drawing the Lines and the Border

Drawing Hexagons

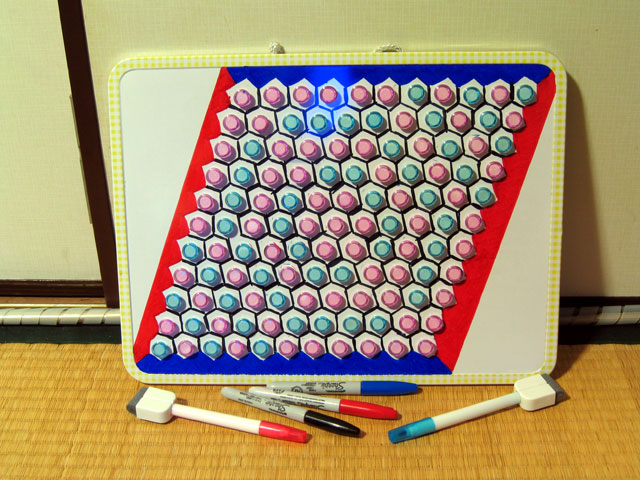
This was one of the trickiest parts. I used a black, permanent marker to draw the borders between the game pieces -- running the marker between the pieces. I didn't get the angles right in several places. This can even be seen here. It becomes more apparent when the game pieces are removed from the board and the board is viewed from edge-on. At that point, the zigzagging lines can be seen and adjusted -- mostly by strategically making the lines thicker. The thicker lines are visible in the next picture below.

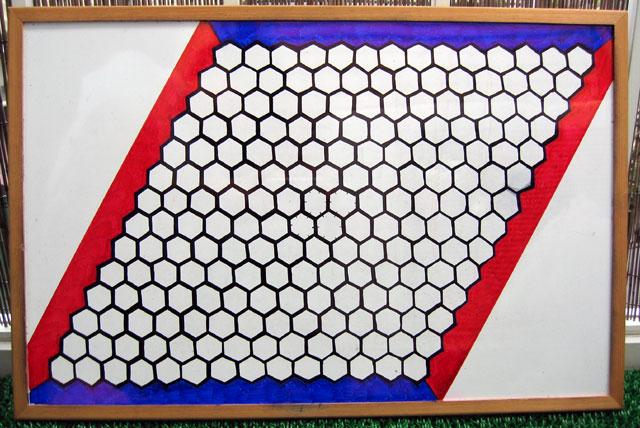
In the photo above, I have also colored in the blue and red borders with permanent markers. This was fairly easy.


Final Result

Finished Board

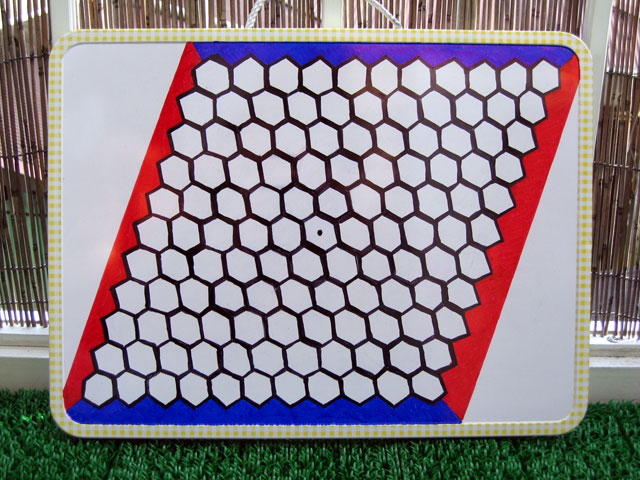
Well, this is the final result. I have played several games, and the lines are all holding up well. I did use two different permanent black markers. The cheap ¥100 pen actually discolored overnight and wiped away with a tissue. My Sharpie and my Zebra pen both held up *much* better.


Conclusion

Money? It cost about ¥1000 for game pieces and ¥100 for the board. Almost everything else I already had. ¥1100 is only ten dollars US currently. This certainly was cheap.

Time? I spent hours and hours doing this. If I were to do it again, with the notes on this web page, even using a different sized board, I would guess it would take me a little over an hour to arrange the pieces, ten minutes to trace the lines, and then thirty more minutes to adjust the lines and have a pretty good board done. That sounds a bit optimistic, so, maybe I could do it all again in less than two hours. The critical factor in all this, though, is, "what will you use as game pieces?" Their size and other characteristics will determine much of the rest of your project.


Alternatives and Improvements

Boards and pieces:

The ceramic tile idea is sounding less-and-less feasible to me now. Such a board would be very heavy. Though, if you were to have the material and inclination to learn how to lay tiles, I can imagine you could make a very nice table-top game set. Poker chips would make workable pieces, though something more substantial would be needed to complement the board. Again, Go stones come to mind. Perhaps coins (especially a set of foreign coins) would work out well. Maybe the colored glass stones used in flower arranging would nicely as well.

Layout:

There must be a more precise way to lay out the board. I think you need to put game piece to game board to determine sizing under any DIY scenario. But once you have that info, I think drawing temporary lines, intersecting at 60° and 30° would work. You would then erase segments of those lines to make the final hexagons. It would all be very precise, but, you wouldn't actually save any time. It would perhaps be useful for making multiple boards of the same dimensions.

Next Hex board challenge for me:

Wood. Use pieces to calculate spacing. Sketch out the 30/60° rhombus. Plot the 10, 11, or 14 points along each edge and draw the straight lines connecting opposite sides. Use a drill press the drill circular holes at each intersection. Don't forget to leave space around the outside of this figure for a second 30/60° rhombus. Extend the diagonals of the first rhombus to the corners of the second. This makes a nice border. This sounds like it would work, and I have created several pdf's in preparation for this. Click on the icons below to see my images:

HexBoardGeometry
HexBoardGeometry
HexBoardDrilling
HexBoardDrilling

Further idea: printed on paper. There are some printable Hex boards available at Randy Cox's site. Randy has made an 11x11 board that can use coins as game pieces if printed on US legal-sized paper. You can experiment with different nations' coins -- copper-colored US cents and silver-colored Japanese yen would be a good and cheap option. I have also made some printable pdf Hex boards. These are 14x14, thus the hexagons are too small for most coins. These are still good for traveling or other situations. You just need to print several pages (or make copies). Carry the pages with you and a red and a blue marker. You can play nearly anywhere. Easy.

14x14 Hex A4 paper
14x14 Hex A4 paper
14x14 Hex Letter paper
14x14 Hex Legal paper
If you click on the above links, and your browser doesn't know what to do with the file, you will have to download Adobe Reader. Use the link here ---> Get Adobe Reader (free) The download and installation is free and easy. It is a useful application to have on your computer. Choose "dialup connection" to get the smallest and simplest download and installation choice from Adobe.


Update: Second Board Done

Board Two -- 14x14
click here or on photo above for bigger image

I made a second board! I pretty much followed the same pattern as the first board. A few notes: 1) I had this board already. I don't remember how much it cost. 2) This board is much bigger than the first -- about twice the area with a 572 mm long diagonal. The piece distribution is 44 mm, 4 mm larger than the smaller board. I can more easily use the larger 20 mm pieces on this board (which I have ordered in true blue and red from an office supply store) 3) This board's layout is 14x14, so the center diagonals do not share a common piece. There are four pieces at the center of the board (marked in the photo.) 4) The time estimates I gave above are mostly right, except for the final line-drawing. It took me five or six hours to trace out all the lines (done while half-watching TV). I was much more careful in this regard this time. The final result is quite good across the board. The only problems remained on the edges. An extra row of pieces marked with dry-erase markers would solve this problem. There is one cell on the upper-right that was so misshapen that I tried to use alcohol to "erase" it. It didn't quite work; you can still see the gray area there.

I am happy with the second board. I will leave it at home and use the smaller board for traveling. I do hope I can eventually clear the gray area off the larger board, but I am just happy the alignment worked out so well for now 8-)


Links

Wikipedia (free encyclopedia made by you, uh, us -- the internet user)
wikipedia's Shogi article
wikipedia's Go article


wikipedia's Hex article
The movie A Beautiful Mind
The PBS Special A Brilliant Madness is supposedly a much more accurate portrayal of John Nash's life
BoardGameGeek's page on Hex <-- Click around on their many links
Chessex's large flexible game boards (you can trim down to Hex size and shape)
Yutopian Go stones, Shogi sets, plus more
Joao Neto's Deck of Boards a DIY kit for multiple games in one package

kurnik -- play Hex online

Greg Conquest, 27 to 31 March 2004

[Return Home]